Mineral Identification
WHAT THE HECK IS THAT?
Mineral Identification Simplified
WELCOME TO THE WORLD OF THE ROCKHOUND
The most frequent question about rockhounding you will hear, is the question – “what is this?” It is for that reason I am writing this Mineral ID series. Your first encounter with the mineral will be to recognize it as something to pick up. Beginning rockhounds are prone to pick up an everyday rock and ask what it is. They are often disappointed when the answer is levitrite (leave it right here). If you are at this stage, don’t be frustrated. Interest is where it all starts.
Mineral identification starts as a visual skill. Many new hunters can’t tell the difference between a chunk of massive quartz and an agate. It doesn’t take long for them to be able to pick up either and know which is which without any question. That being said, you need to do some study when starting out your hobby. After all, the polished and faceted gem in the jewelry shop window isn’t what you are going to see when digging it off the side of a mountain or panning it out of a stream.
Go to museums, rock shops, and rock and gem shows and just browse. Pay attention to the patterns, colors, shapes, etc. of the different material you see. Notice what the material surrounding the specimen (the matrix) looks like if some of it has been left. Look at pictures of minerals in guides and on the Internet. Do not expect to remember everything you see. What you will do by browsing is familiarize yourself with all of the different looks of minerals and all the different types of rock in which minerals are found.
Before going any further into learning to identify minerals, you need a comprehensive guide to minerals. The best on the market as far as I am concerned is the Audubon Field Guide to North American Rocks and Minerals. If you live elsewhere than the United States, you will want to look for one of the many guides available which will include rocks from your area.
A good guide, such as the Audubon Field Guide will not only have pictures of a large variety of minerals, it will list the properties, such as color, occurrence, hardness, streak, and so forth. You will not remember all facts about all gems, so having the guide to check your results against when identifying a gem will save you a lot of time and headache.
Now that you have a great guide we can discuss each method of identification on its own. There are many methods of identification. Sometimes just one will do the trick and sometimes you will need to use several. On rare occasions you might still need a professional with some heavy duty scientific equipment, but most minerals can be identified without calling in the scientists to do so.
The sections below discuss different aspects of a mineral that you will find listed in your guidebook. It not important that you remember how each mineral is classified, but it is important that you know what each aspect is talking about. This discussion will familiarize you with the different aspects that are used for identifying minerals.
Occurrence
“Occurrence” has two different meanings, and both matter when hunting minerals. The first meaning of “occurrence” is where the minerals are located. Knowing where different minerals occur will not only help you plan a hunt, it will help identify minerals you find when you get there. If
you find a pink gemstone and you are in an area where you can find sapphire, it is likely that you might have a sapphire. If that is not the right location for sapphire occurrence, you might first want to consider that the stone might be a garnet. This is where extra information might be needed about other properties of a stone to tell what you have found.
Occurrence also means the particular type of rock that the mineral may be found in, also known as the matrix rock. This meaning of occurrence is termed the mineral’s “association”. The matrix rock can vary widely from place to place. In Southern Idaho you can find occurrences of garnet in, that is, “associated with”, granite. In the occurrences in Chaffee County, Colorado it is associated with tuff.
Knowing which rock a mineral can be found in the area you are hunting will narrow down your choices of what type of mineral you have found but it is not a foolproof method of identification as many types of minerals can be found in the same matrix rocks. Knowing the matrix will help you find the location of the mineral more easily to start with when you are hunting, however.

Many minerals in the same area of occurrence may not only share matrix rock types, they may share a common color as well. So we will discuss color next.
Association
Association refers to what types of minerals are likely to be found in the same environment. For instance, pyrite, quartz, and biotite can often be found in the same area. Beryl can be found with almandine in schists, or with muscovite in pegmatites.
Do take note that when you find a mineral, you won’t always find associated minerals. Finding one does make it much more likely that you will also find associated minerals, however.

Color
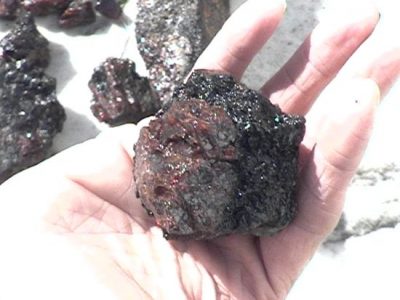
One manner of identifying a mineral is by its color. Many minerals occur in more than one color, however. Garnets are most widely known for their deep burgundy red. They also come in brown, pink, and green. Sapphires are known most widely as blue stones, but they can also be found in pink and clear, too.
Knowing the possible colors of a mineral greatly helps in the process of identification. A rich blue crystal found in an area known to produce sapphire would seem able to be identified as sapphire just by looking. You could be in for a surprise, though, as there are a few other minerals that are blue and might occur in the same location as sapphire.
Sometimes the name a crystal will go by is determined solely by its color, too. Beryl is a mineral that goes by different names according to the color of the stone. Aquamarine is a blue/blue green beryl. Emerald is also beryl. Quartz crystals are predominantly colorless. There are purple quartz crystals but they are called amethyst. By the same token, a yellow to orange quartz crystal is known as citrine. Corundum in blue, clear, and pink, on the other hand, are all sapphires, except corundum which is pigeon blood red, which is ruby.
Like colored minerals of different mineral species are often common in a particular location because of the elements in that area that can alter the color the mineral. For example, in an area with high concentrations of copper, you may find many different blue and green minerals in the area. Blue and green minerals are “associated” with copper.
When you pick up several different minerals that are very close in color from one mineral to the next, identifying them will rely on knowing more than occurrence and color if you are not already well familiar with each.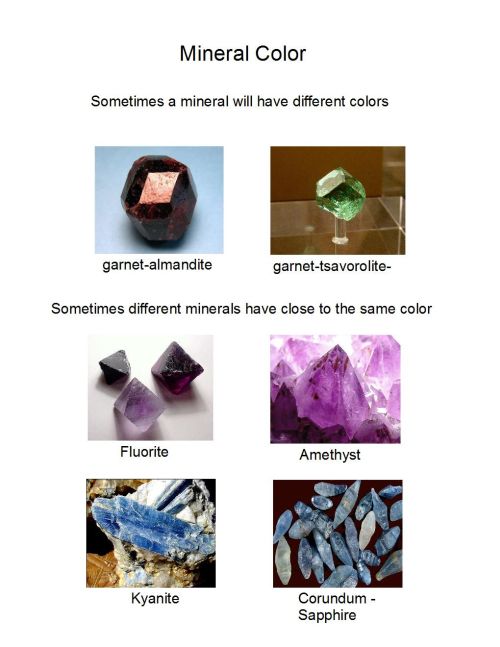
We have already taken a look into how occurrence and color can be used to identify gemstones. The next properties that can be used to immediately identify your find will be luster and transparency.
Luster and Transparency
Luster is second only to color in mineral identification. Luster refers to how a mineral transmits or reflects light. A mineral’s transparency is opaque, translucent, or transparent. The transparency is pretty self-evident. You can either see through a mineral, see into it, or all you can see is the surface.
Minerals of each transparency category have a luster or shine (or lack of one). The luster is the look of the mineral as light is either reflected or refracted. A metal is opaque and will reflect most of the light that hits it and is said to have a metallic luster. Quartz appears glassy and the luster is said to be vitreous.
Terms for luster and examples are listed below. While this all sounds complicated, luster is one of the easier properties to learn. The labels used to describe luster are often fairly self-explanatory. Just as with transparency, however, the luster of a mineral can vary a bit.
For example if you find a piece of fluorite with some incandescence, it may look more pearly than glassy. Opal can sometimes look more waxy than glassy. A little experience and a little knowledge of other properties will help you decide what your mineral is. Once you can fully recognize opal, you will not be tempted to mistake it for an agate even if it appears a bit waxy instead of glassy.

Streak
Streak and hardness are pretty simple, straightforward mineral properties to understand. Methods of identifying minerals by testing these properties are equally simple to use and understand.
Streak
A mineral’s streak can tell much about what type of mineral you are holding. The term “streak” means the color of strip that a mineral leaves when you run that mineral down a particular type surface. The streak is most often produced and checked using unglazed porcelain. You can use the back of a tile. You can also buy streak plates from rockhound supply shops. They are extremely handy to have around, and also cost only a few bucks so it’s pretty easy to afford a supply.
Not all minerals leave a streak, but those that do, leave a streak of a specific color. Gold will leave a gold streak. It does not leave a streak of any other color. Does this mean that you positively have gold if you have a gold streak? No, it doesn’t. There may be other minerals that leave a streak that you might accidentally identify as “gold”.
A streak seen as gold, however, narrows down the chances of what you do have. If you have pyrite, which can look much like gold (hence the name “fool’s gold”), you will find the streak is greenish black. If you have pyrite, then, you know very quickly when you check the streak that it is not gold.
This brings up a problem with some streak testing. This problem is a matter of vision. It can be quite difficult to tell a silver streak from a gray streak for instance. There is not much you can do about not seeing the differences in streak if you don’t at first. You will learn it with experience. If you are guessing between gray and silver, however, at least you are still ruling out those which leave black, blue, or other color streaks.
To check the streak of a mineral all you need to do is run the mineral across the streak plate and see what color the line it leaves is. You will want to use a corner of the mineral that won’t risk the mineral being ruined in the process.
Streaks of some common minerals are:
Beryl – White
Corundum – White
Galena – lead gray
Gold – gold or yellow
Silver – Silver
Calcite – white to gray
Hardness
The hardness of a mineral can also be used to help identify it. A mineral can be scratched by anything harder than itself. A mineral can never scratch another mineral harder than it is. A diamond, the hardest
mineral cannot be scratched by anything but another diamond. Don’t confuse that to mean that you can hit it with a hammer without shattering it. While diamond is the hardest mineral known, it’s not high on the toughness scale, and if you smack it with a hammer, that stone is going to shatter.
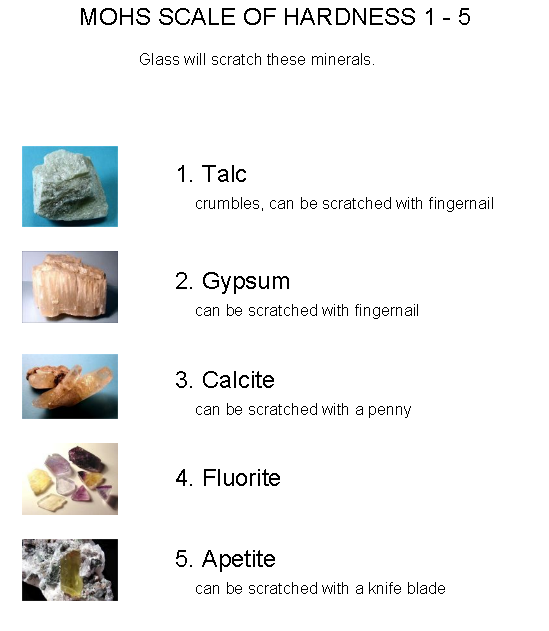
Mohs scale is the standard scale for measuring mineral hardness. Using the scale is a pretty simple means of identification, but you need have something of the correct hardnesses to attempt to scratch the mineral in question with.
Mohs scale is a proportional scale, not absolute. For instance, while fluorite(4) is 2.33 harder than calcite(3), diamonds(10) are 4 time as hard as corundum(9) . Feldspar(6) is less than twice as hard as apatite(5). While there are scales of absolute hardness that scientists use, rarely if ever, would a field collector need such a scale.

If you have a mineral which feldspar scratches but fluorite will not, you can guess the mineral is about 5 on Mohs scale. Minerals can scratch others of the same variety or hardness. For instance, a garnet will scratch another garnet.
Minerals can range in hardness. Garnets range from 7.0 – 7.5 and emeralds range from 7.5 to 8, for example. These variances can be caused by weathering, chemical impurities, etc. Despite small variances such as these, testing hardness is a good technique for identifying minerals.
Some common items that can be used to test hardness are fingernails (2.2), pennies (3), knife blades (5), window glass (5.5), and a steel file (6.5). You can also buy sets of hardness points. These are fairly inexpensive and can help greatly in identifying items out in the field.
When you scratch a mineral, be sure when you look at the scratch that the mineral is actually scratched. Sometimes the “scratch” is not actually a scratch, but rather a streak left by the object you tried to scratch the mineral with.
You also want to be careful about where you try to scratch a mineral. If you have a beautiful and perfect crystal you do not want to run a scratch down the side of it. Be discreet about where you scratch the specimen.
As with anything else, identifying minerals using streak and hardness take some practice, but they are easy methods to use. Your field guide will tell you what color streak and what hardness each mineral is, so all you need to do is check your results against your guide. It doesn’t get easier than this.
Cleavage and Fracture
Cleavage and fracture are important in mineral identification because certain minerals break or split in predictable ways because of the
arrangement of the atoms which build the mineral. Recognizing how a piece of mineral breaks can help you identify what the mineral is.
For example, if you pick up something you think is an agate and it has
a chip in it that is shaped a bit like a shell, you possibly have an agate. If the chip is jagged like teeth, that’s not the way an agate will break so you know you don’t have an agate.
Again, before I go any further, I must reiterate the importance of having a comprehensive field guide to help you identify minerals. There are approximately 3,800 known minerals with more being discovered each year. It is unrealistic to think that you will remember everything about each mineral. Even experts use guides to look up mineral properties.
Now what do “cleavage” and “fracture” actually mean?
Cleavage and fracture mean the ways a mineral breaks. Cleavage is how it breaks on the faces, and fracture is how it breaks along edges or if a mineral is gouged. To understand the concepts of breakage, imagine a box. Let us say the box is a mineral. The box has a top, bottom, and sides. These are faces.
The edges are where the sides meet or where the top meets the sides, etc. A fracture is a chip in the mineral. This chip can be in the face or on the edges of the mineral, so if you have a gouge in your box, it is a fracture. The properties of this gouge will tell you what your mineral might or might not be.
Say for instance that the chip is shaped like a sea shell. Your box then might be agate, obsidian, opal. If the chip is jagged, you don’t have one of these silica stones.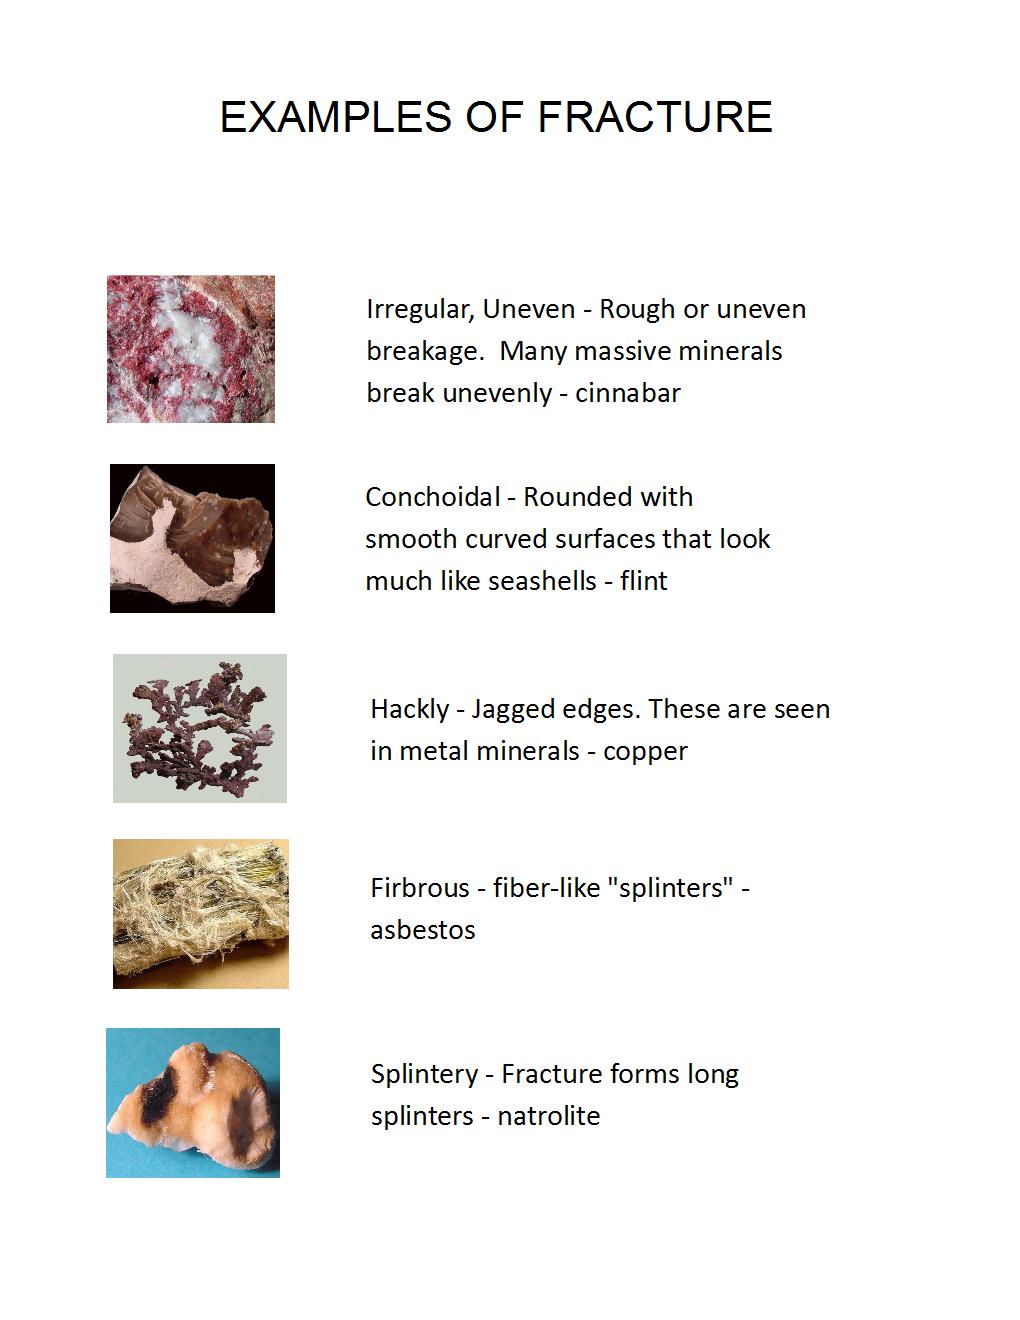
You may at times see a descriptive term for a fracture that is different from other references. These may be taken to be descriptive and will fall under one of the more well known fractures.
Now, say that a layer of the side of the box is peeled off so you have a whole new face on that side of the box. That is cleavage. It is still a break but it leaves a whole new surface on a face of the box. Because the atoms of a mineral will form planes, the flat surfaces will break parallel to these planes. The direction that these planes break are the cleavage planes. Cleavage planes will always be parallel to a face of the mineral.
Because minerals have different geometric shapes, there are many possible types of cleavage. The cleavage will always match the minerals symmetry and each mineral will always have the same cleavage. You can reproduce cleavage. Of course, if you find a great mineral, you really are not going to want to do that. It is not wise to try to produce a break in a mineral to identify it. If you don’t see a break, find another way to tell what the mineral is. Some minerals have no cleavage.
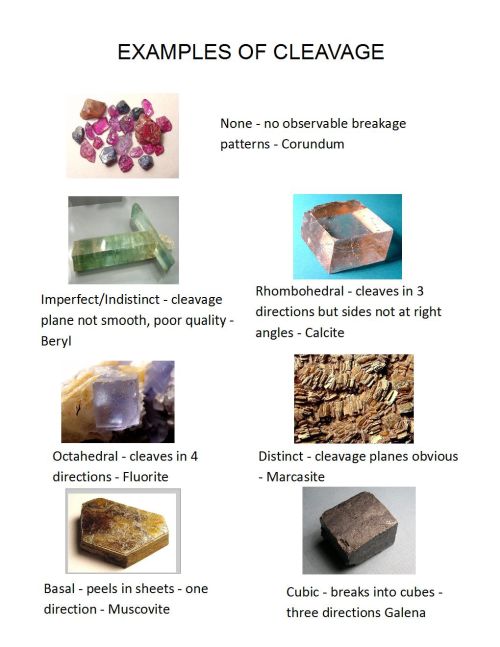
Cleavage is also described in terms of quality. These terms are perfect, imperfect, good, distinct, indistinct, and poor. Other terms will describe how easily you can produce the cleavage – easy, hard, and difficult.
For an easy example, consider mica. It has basal cleavage – that is it cleaves in only one direction. It breaks in sheets. It also leaves a smooth, clean plane, and it is easy to break. So mica can be said to have perfect basal cleavage. You might see it described as easy basal or easy or perfect 1, the one meaning it only cleaves in one direction.
If a mineral cleaves at right angles it has 2 directions. A cube will cleave in three directions (picture two sides and the bottom of your box breaking away from the top corner of a stack of boxes, then the box under it can be broken off in the same manner). Some of these breakages can get very complex as some crystals have quite a few sides and many possible
breakage planes.
Some minerals will not cleave the same in all directions. You might get one direction that looks smooth and cleaves easily while other directions do not look as smooth or break as easily in those directions. Gypsum is an example of this principle. It cleaves well in one direction but only poorly in 2. You may see it listed in a book as perfect 1, poor 2.
It may take you some time to start getting the hang of identifying mineral cleavage but it will help you once you do. Start with the simpler cleavages first and once you understand those well you will be on your way.
This list just shows a few cleavage characteristics to introduce you to cleavage. It is a good idea to go through your Audubon Field Guide and study some of the cleavages of different minerals. If you have specimens at home, study them and guess what kind of cleavage you think they are, then check your field guide to see if you were right or even close.
This method of identification can seem very strange to learn at first but don’t give up on it. Sooner or later you will catch on to it and you will find it very handy when you do. Remember that all aspects of rock and gem hunting take practice and don’t let yourself get frustrated.
Mineral Habit and Crystal Form
Mineral “habit” and crystal “form” mean how a mineral or crystal is shaped. Most guides will refer to both as the “habit”. Habit can be confusing because it can change from place to place just as the matrix
rock can. You might find a mineral in massive form in one area while it will be found in sharp, distinct crystals in another.
To clarify this statement, think of quartz. Massive quartz “stones” can be found just about everywhere, but quartz crystals will be harder to find because the mineral just doesn’t crystallize everywhere. The habit is determined by many factors under which a mineral develops, such as heat, impurities, pressure, space, and so forth.
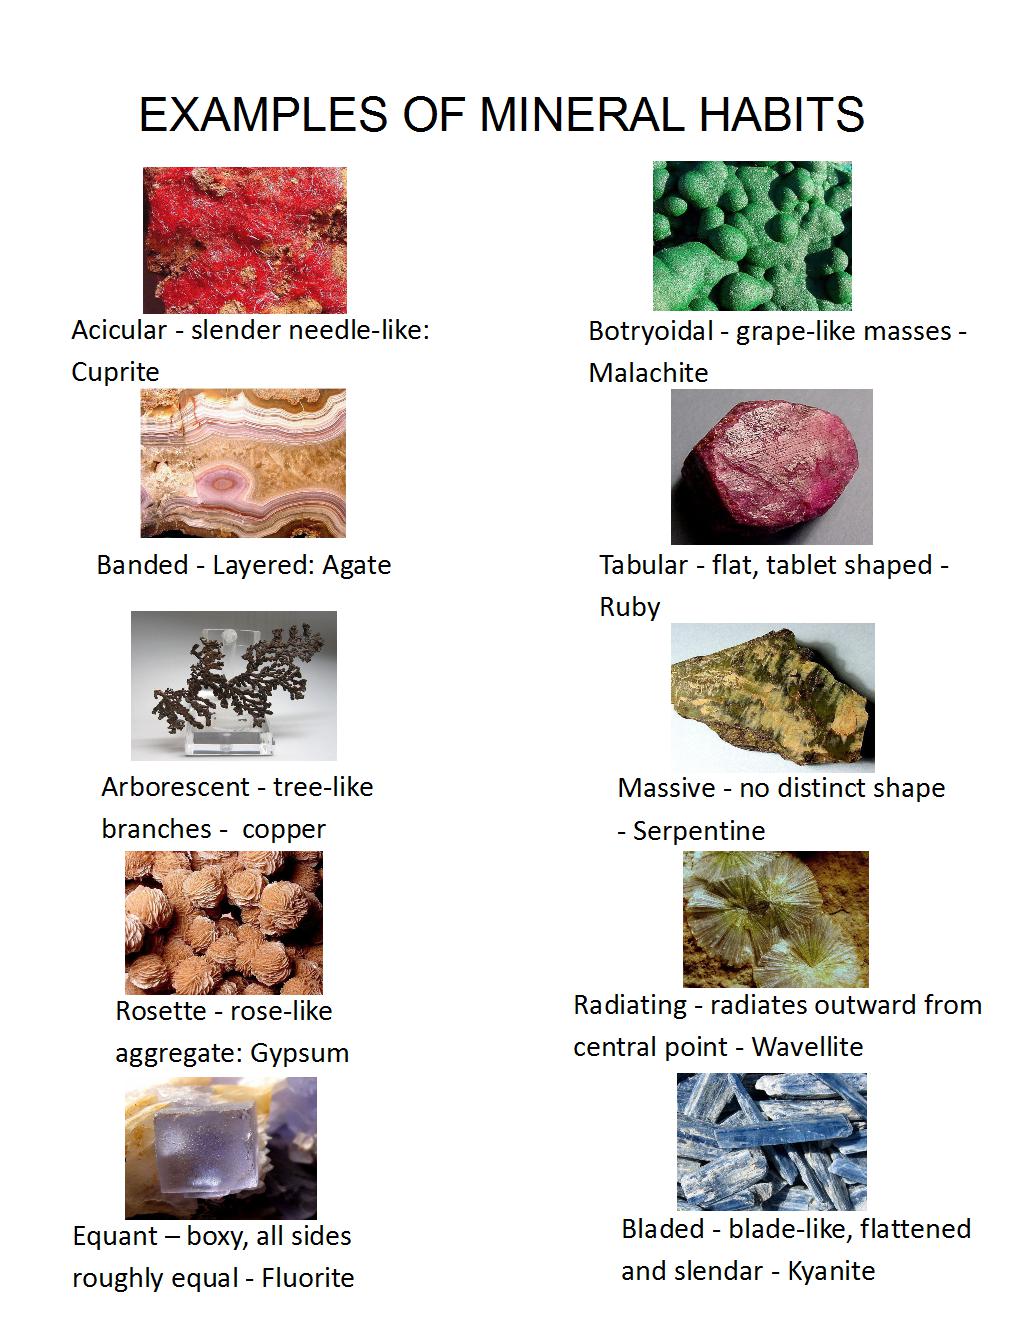
Keeping the example of quartz in mind, this mineral may be found in
massive, drusy, pseudomorph (cat’s eye), and prismatic crystal habits.
Differing minerals can have the same habit, such as galena and fluorite which both have cubic habits. Some can have small variations of the same shape. Quartz and beryl both are six sided prismatic crystals – but quartz crystals are terminated (the termination is the end of the crystal) in a pyramid shape and beryl has a flat (basal) top.
When a mineral has formed crystals, “habit” will mostly refer to the geometric shapes of the “Crystal Form”. A mineral can crystallize into shapes as simple as cubes or into extremely complex shapes with many faces and more than one geometric pattern. Some minerals will have different crystal forms, too.
Pyrite may grow in cubes, pyritohedrons, octahedrons, as well as variations of each of these forms. This is one of the reasons it sometimes takes many methods of examining a mineral to be able to tell which mineral it is.
Unless you have a special hobby or profession that makes it a necessity for you to learn all of the geometrics and intricacies of mineral crystal systems, you don’t need to worry about being able to identify each system and how it works, or every geometric pattern possible in each system, but you do want to at least be familiar with the idea of crystal forms and systems.
As you gain hunting experience you will begin to see how you will adapt to being able to identify the minerals by recognizing their habits and crystal forms. It is an especially handy means of identification when many minerals in an area are the same color. Once you have learned how quartz crystals are shaped, you will not confuse them with other minerals such as calcite or clear sapphires, which can be the same color but will have crystals that are not the same shape.
Listed below are some examples of common crystal forms and mineral habits.


Next we will move on to Tenacity, a property which can cause the shattering of many a diamond when misunderstood.
Tenacity
Tenacity, also known as a mineral’s toughness, is the durability of a mineral – the more difficult to break, the higher the tenacity. Do not confuse toughness and hardness. Despite common belief, if you smack a diamond, the hardest mineral, with a hammer it will shatter. The hardness of a diamond is not the same as it’s toughness. Jade has an extremely tough mineral. While it is not nearly as hard as a diamond it is tough enough that in ancient China it was often used as an anvil.
Some minerals are very hard, but are still also quite brittle and break with ease. Exactly how the mineral breaks is also referred to by tenacity. Gold will flatten into sheets when hit. Brittle minerals (which most are) can be pounded into powders but the amount of effort to do so will vary. Some minerals will bend when pressure is applied.
Below is a list of a few mineral tenacities that will help you identify some minerals.
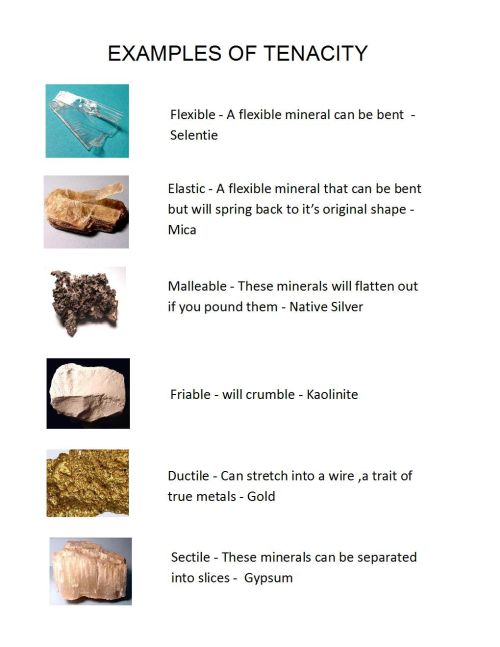
You do not have to hit a mineral to tell if it is brittle. When checking for hardness, if scratching the mineral produces some powder of that mineral, it is brittle. Remember not to scratch a fine mineral where the scratch will lessen it’s beauty and value. When testing for flexibility or elasticity, be careful when you put pressure on it. Even these minerals will break after a certain point so check gently and slowly for these traits.
Specific Gravity/Density
Density is the measure of the mass of an object compared to its volume. In relation to minerals, Specific Gravity refers to how dense a mineral is compared to water. I have seen many technical explanations of this principal and will try to keep this explanation as user-friendly as possible.
If you want physics level explanations, you can find plenty of discussion of density in textbooks. Most minerals are around 2 – 3 times denser than water. If you pick up a piece of gold and an equally sized piece of quartz, you can feel that there is a difference in the weight of the pieces even though the size is the same.
Gold has a high specific gravity (around 10 depending on the purity) and quartz is only average (2.54). While the most valuable metals have a high specific gravity, the value of a mineral is not determined by it’s gravity. Diamonds have a 3.52 gravity while fluorite has a gravity of 4. In your field guide you will see the density of minerals described as as light, heavy, etc.
Below is a scale that gives examples of different gravities.
Very Light – less than 2 – borax
Light – gypsum 2 – 2.5
Average – quartz – 2.54
Heavy -fluorite, almandine garnets – 4 – 5
Very Heavy – galena and pyrite- 5 – 10
Extremely heavy – gold, silver – 10
Super Heavy – platinum – 20
Testing specific gravity may seem to be advanced mineral ID that you might never need to learn, but it is quite handy to know. Consider how alike many metals look. Could you tell a piece of platinum from less valuable metals if you found it?
If you tested the specific gravity of a piece of platinum, you would not have to wonder what it is. Platinum has a gravity of 20, which is extremely heavy, twice that of gold. If you are panning in a stream and find a crystal that has been water worn, it may be hard to tell if that crystal is topaz or quartz. The shape would have told you had it not been smoothed by water. Being that quartz has a specific gravity of 2.54 and Topaz is 3.5 – 3.6, by testing the gravity, you have solved your identity issue easily and have not needed to damage the crystal at all to identify it.
Professional gold prospectors are well aware that some specimens of gold are more pure than others and assay higher. They can get a good idea of the purity of their cache through specific gravity testing, too. While the hobby oriented gold hunter may be thrilled with a nugget even if it has a high mix of other metals, a professional prospector who depends on gold for a living might not want to spend a lot of time in an area where the gold is too diluted to be of high assay value.
While you might have to be mathematically inclined to understand how density measurement works, you do not have to be a physicist to learn how to test for specific gravity. The way to test the gravity of a mineral is to see how much weight it loses in water. First you weigh the mineral in air.
Then put the mineral in water. Weigh the amount of water displaced by the mineral, then divide the weight mineral in air, by the weight of the displaced water. The result will be the specific gravity.
Other Mineral Identification Methods
The methods of mineral identification we have covered in this series are the most important ways to tell what a mineral is. They work for generally all minerals. There are other methods that also are good methods but are relevant to only a few minerals so they are not a usual method of testing.
You might use these methods in specific circumstances, but for everyday mineral testing, they would be of no avail to your identification efforts.
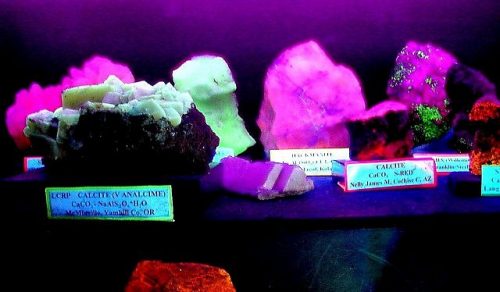
Fluorescence
Only a few minerals are fluorescent. You need an ultraviolet light to see
fluorescence. Aragonite, willemite, and fluorite will all glow beautifully under a blacklight and you will occasionally see specimens displayed under a blacklight.
Sometimes you will find minerals that fluoresce a yellowish/green. This fluorescence has nothing to do with the identity of the mineral. The fluorescence is due to radioactivity, and a Geiger counter will react to these minerals. Um…by the way….you really do not want these specimens laying around your house.
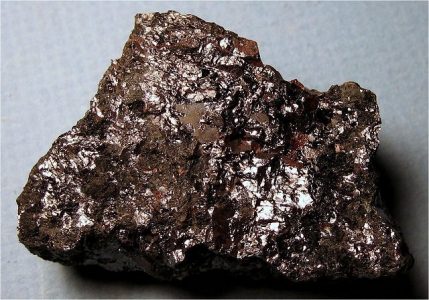
Magnetism
Magnetism can also be used to test only one or two minerals. Magnetite is the only commonly occurring magnetic material, so unless you are looking specifically for this material testing for magnetism is pretty much a waste of time. Meteorites also are often magnetic, so having a magnet when looking for them is a good idea.
Taste
I am going to forgo any temptation to cover identifying minerals by taste. While it is true that you can tell some minerals by their taste, it is equally as true that many minerals are toxic and I really don’t feel it is a good risk to start licking minerals to see what they are. Arsenic is known for having a sweet, garlicky taste. Do you really want a mouthful of it to decide what it is? How about a mouthful of uranium? Those might seem to be extreme examples, but many minerals that you will find in the field are toxic to one degree or another, and for my money there are plenty enough methods by which to identify a mineral without risking illness over it. You should never taste a mineral – especially if you don’t know what it is!
.
END NOTE:
If you have read the complete report on mineral ID, you now have a pretty good idea of how to start using the different methods to figure out what mineral you are holding in your hand. Some of these methods will seem a bit confusing at first, but as you use them, you will not only become more familiar with the methods themselves, you will also become more readily able to identify the minerals that you find.
You will learn to identify some just by looking at them via experience and time. Others will require multiple tests no matter how experienced you are. You will soon find, however, that the more you are able to identify
specimens on your own, the more fun and rewarding your gem hunting experience will become.
I hope you have learned something that you will use and enjoy – and pass on to other new hunters along the way.
A Special Thanks: To RWeller/Cochise College for the use of many of the pictures used to build the charts.
HAPPY HUNTING!
